Moving To a New Site

I have just decided that it's time to move on and have my own domain. All the posts in this blog will be moved to:

www.pinoygeek.org

Personal posts will be transferred to: raldz.pinoygeek.org
Showing posts with label Mods Tips and Tweaks. Show all posts

Sunday, January 29, 2006

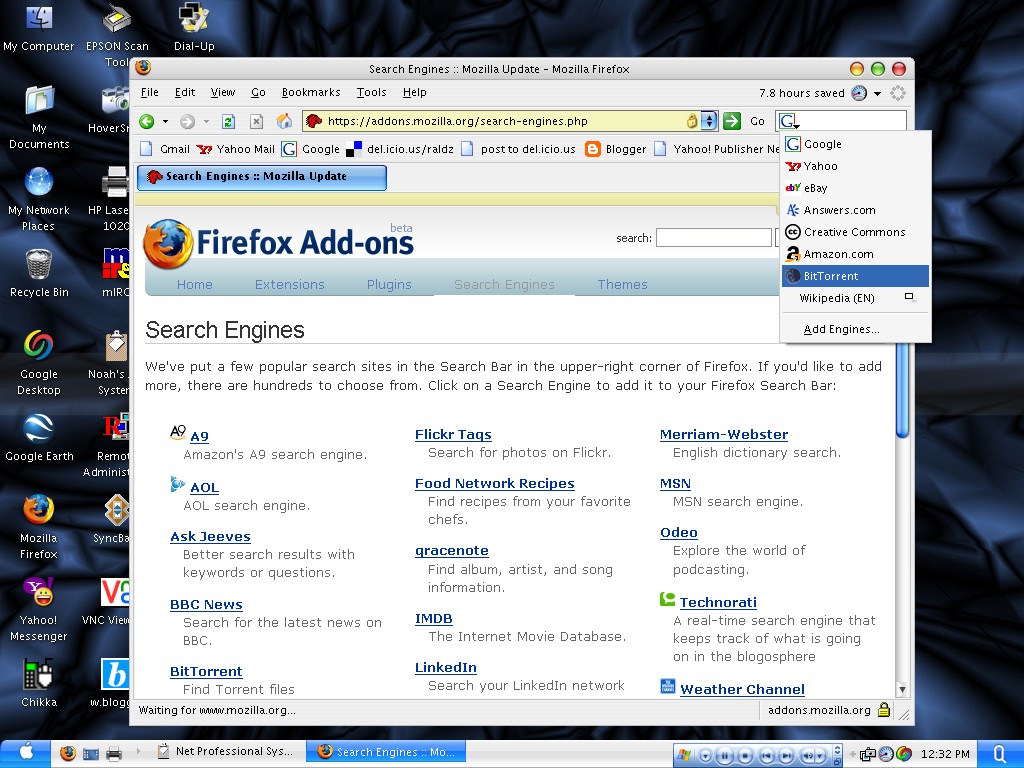
Firefox Add-on: BitTorrent Search Engine

Since I started using Linux, I download my CD ISOs using web downloads. But when I started using uTorrent, I tried looking for the best search engine for finding torrent files specially for Linux distros. While playing with Firefox, I noticed the little search box on the upper right corner which I have never used since I installed Firefox. Oh, well, I got I lot of spare time, so why not discover what else Firefox has to offer. So, I saw an "Add Engine" at the bottom of the menu and clicked it.. alas! it took me to a page of Firefox Search Engine Add-Ons! And there I found the BitTorrent search engine. So I added it to my search engines, typed in "Linux" and found a vast array of ISO torrents from all over the web. The BitTorrent search engine grabs the list from other major BitTorrent Trackers. And now Firefox has again amazed me in making my cyberlife a little more easy. =)

Sunday, December 11, 2005

Make Firefox run up to 30 times faster

1. Type "about:config" into the address bar and hit return. Scroll
down and look for the following entries:

network.http.pipelining
network.http.proxy.pipelining
network.http.pipelining.maxrequests

Normally the browser will make one request to a web page at a time.
When you enable pipelining it will make several at once, which really
speeds up page loading.

2. Alter the entries as follows:

Set "network.http.pipelining" to "true"

Set "network.http.proxy.pipelining" to "true"

Set "network.http.pipelining.maxrequests" to some number like 30 (mine is set to 100..hehehe). This means it will make 30 requests at once.

3. Lastly right-click anywhere and select New-> Integer.
Name it "nglayout.initialpaint.delay" and set its value to "0".
This value is the amount of time the browser waits before it acts on information it recieves.

If you're using a brodband connection you'll load pages 2-30 times faster now.

Orignally posted at: Halomods

Tuesday, October 18, 2005

Using JavaScript to Rotate Google Adsense and YPN ContentMatch Ads

By: Amr Awadallah

I wanted to test the performance of Adsense versus YPN-Content match on my site, so I wrote this little javascript wrapper to rotate both ad formats, 50% of the time for Google Adsense and 50% of the time for Yahoo-YPN-ContentMatch.


Feel free to use it, but note that you need to paste your ads in the correct places as demonstrated below. Just copy the javascript code for adsense and ypn ads and put them in the googlead and the yahooad variables, respectively. But make sure to make these changes to the javascript ads:


  1. replace all " with \"
  2. end each line with \n
  3. replace /script with \/script


<script type="text/javascript">

var i = Math.random()
var googlead = PASTE ADSENSE AD HERE
var yahooad = PASTE YPN-CONTENTMATCH AD HERE
if (i < 0.5)
{
document.write(googlead);
}

else
{
document.write(yahooad);
}
</script>


This is an example of how to paste your ad javascripts correctly into the googlead and yahooad variables (do not use these as is, otherwise you will end up sending me money Image ):


var googlead = "
<script type=\"text/javascript\"><!--\n
google_ad_client = \"pub-1023215734600446\";\n
google_ad_width = 728;\n
google_ad_height = 90;\n
google_ad_format = \"728x90_as\";\n
google_ad_type = \"text\";\n
google_ad_channel =\"3618420306\";\n
google_color_border = \"CCCCCC\";\n
google_color_bg = \"FFFFFF\";\n
google_color_link = \"000000\";\n
google_color_url = \"666666\";\n
google_color_text = \"333333\";\n
//--><\/script>\n
<script type=\"text/javascript\"\n
src=\"http://pagead2.googlesyndication.com/pagead/show_ads.js\">\n
<\/script>\n"


var yahooad = "
<script language=\"JavaScript\">\n
<!--\nctxt_ad_partner = '2432839150';\n
ctxt_ad_section = '1181';\n
ctxt_ad_bg = '';\n
ctxt_ad_width = 728;\n
ctxt_ad_height = 90;\n
ctxt_ad_bc = 'A1A5A9';\n
ctxt_ad_cc = 'FFFFFF';\n
ctxt_ad_lc = '0000DE';\n
ctxt_ad_tc = '737374';\n
ctxt_ad_uc = '439341';\n
// -->\n
<\/script>\n
<script language=\"JavaScript\"\n
src=\"http://ypn-js.overture.com/partner/js/ypn.js\">\n
<\/script>\n"

Sunday, October 16, 2005

Reverse Engineering Software

By g0df4th3r
--------------------------------------------------

Here is a short tutorial to explain some reverse-engineering techniques. Reverse engineering is the modifaction of data to make it do what you want to do. You MUST realise that reverse engineering can be used illegally, and doing so can lead you into trouble, and hurt our economy and developers. You can though use it legally too, for example:


Some wargames present challenges that require the modifaction of applications.

It helps understand some of the very basics of assembly.

You may develop techniques useful in finding exploits, or exploiting them.

Greated debugging skills, at lower-level, and learning about patching and similar.

This is why reverse-engineering should be learned, not to learn how crack programs illegally, as this takes away profit from the software industry, and we want better programs and games. Let's now continue on with the tutorial.

The Program and the Objective

For a start, you have to know what we are going to reverse-engineer, don't you?

Here is the short program written in C++:


QUOTE

code:--------------------------------------------------------------------------------
#include

int main() {
int i;
for (i=100; i <= 200; i++) {
cout << i << "\t";
}
if (i == 0) {
cout << "You won the challenge, congragulations.";
}
else {
cout << "You failed to complete the challenge. Please try again.";
}
}
--------------------------------------------------------------------------------

This program, written in C++ for MS-DOS, it is very simple. If I write anymore tutorials on this subject, the programs will be more compilicated and most likely win32. Anyway, the programs counts up from 100 to 200. You objective is to count down to 0. The program must be compiled in its original form. So how can we change the compiled application to display the string "You won the challenge, congragulations." instead of the string "You failed to complete the challenge. Please try again.". This, with our tools, is infact easy. By understanding how to do it, it does not take long to figure out similar challenges. You will, however, have to know some basic assembly (which I will tell you) to do these operations. By this you will not have to know how to write full blown assembly applications (I can't really) but to read assembly code, in a pseudo affect. To do this, you must learn some very basic assembly. I am listing the important ones below, do not worry if you do not understand these, as I will explain what things do throughout the tutorial.

Assembly Rundown:

Here are some basic assembly functions. The will help throughout the tutorial.
These are not designed to teach assembly, and are not explained very well.

Jumps and Calls

je destination - Jump if equal
jne destination - Jump if not equal
jmp destination - Unconditional jump, always jumps ot destination.
jl destination - Jump if not less
jle destination - Jump if less or equal
ja destination - Jump if greated (above)
jae destination - Jump if greater or equal
jnl destination - Jump if not less
jng destination - Jump if not greater
call destination - Calls a subroutine

Jumps are easy to remember. If you haven't noticed, the operators are derived from abrievated english.


Examples:

je - Jump if Equal
jae - Jump if Above or Equal


Stack operations

push src - Pushes data on the stack (memory). Used for calls, passing data to subroutines.
pop src - Takes data off the stack, puts it into a register.

Stack is last in first out (LIFO) meaning the last piece of data you push in, is the first data you pop out.


Math Operators

inc src - Increment by one (src++)
dec src - Decrement by one (src--)
add src, number - Adds the number to src. ie. src=1, number is 3 so it is 4.
sub src, number - Subtracts the number from src. ie. src=4, number is 3 so it is 1.


Comparisions

cmp src, data - For example, if src=1 and data=1, then the cmp was true.
test src, data - Another comparision operation, useful for testing is a register is zero.


Others

nop - No Operation.

Studying The Program


Programs Needed

Although you can use many tools to get the task done, I will be writing this tutorial to work with these two tools under windows.


W32Dasm

Hiew


Which can be found quite easily, and I believe are both freeware, or offer freeware packages.

If you are working under *nix, then you will have to learn how to use appropiate programs on your system (like gbd).

Finding out what to change

To change this program, we need to study it. You could pull out a hex editor, or a cheap disassembler, and go reading through the assembly, but that would mean more work for you. So, we will use W32Dasm, as it is great for studing the program. To change the program, we are using Hiew (Hacker's View) which is quite easy to use.

So, what do we need to change. In this tutorial we will be reverse-engineering this program in two different way, whose output will be similar, but a little different.


Studing the program is the most important part you do. First run the program and examine it output. It counts up from 100 to 200, and then prints a string: "You failed to complete the challenge. Please try again.". This is enough to start tracking down the operations and the desired result.

Make 2 copies of the application which you have compiled. Open up W32Dasm, and select Disassembler-> Open File to Disassemble. Locate the original application, and open it. This should start the disassembly process, which is quite quick for this application. When disassembly is done, make sure the font is of readable type. If not, change it to something more suitable by going to Disassembler -> Font -> Select Font. Now, what do you think we have to do to find out what to change. I will tell you, we have to find our string "You failed to complete the challenge. Please try again." (without quotation marks).

There is two ways we can find this out:

One way is to go to the string references by clicking on the the toolbar option Str Ref (string references) or by going to the menu option Refs and String Data References. This is all the strings used by out application. The majority of them being junk (to us) added by the compiler. You can then search down through this list, which is in alphabetical order, for our string. When you find the string, double click on it, and you should be taken to a new location in the disassmbly listing.

The other way is by going to Search -> Find Text, and searching for our string. Type in something like "You failed" without the quotation marks.

I am now assuming you are near a push instruction. Above this push instruction is our string, and some text. This looks like this:


QUOTE

code:--------------------------------------------------------------------------------
* Referenced by a (U)nconditional or ©onditional Jump at Address:
|:00401180©
|

* Possible StringData Ref from Data Obj ->"You failed to complete the challenge. "
->"Please try again."
|
:00401196 68A2A14100 push 0041A1A2
:0040119B 685C044200 push 0042045C
:004011A0 E88F810000 call 00409334
:004011A5 83C408 add esp, 00000008
---------------------------------------------------------------------------------

Now, we are most interested in where the program decided to choose this option, instead of an other option. So, look at the second line. It has this written within it: 00401180©. The © means that it was from a conditional jump, meaning it was not a jmp statement, it had some critera to judge what to do. So now, we want to see the instruction that called this, so go to Goto -> Goto Code Location. Type in the text box, the location, which is 00401180 (may differ on your computer). We can now see this:


QUOTE

code:--------------------------------------------------------------------------------
:0040117E 85DB test ebx, ebx
:00401180 7514 jne 00401196

* Possible StringData Ref from Data Obj ->"You won the challenge, congragulations."
|
:00401182 687AA14100 push 0041A17A
:00401187 685C044200 push 0042045C
:0040118C E8A3810000 call 00409334
:00401191 83C408 add esp, 00000008
:00401194 EB12 jmp 004011A8
--------------------------------------------------------------------------------

The failed string area was called by a jne (jump if not equal) statement. Look at the statement above it, is reads test ebx, ebx. This statement test that ebx is equal to zero, ebx holds the number used for the loop. Now, we know that ebx cannot hold zero without changing the code, but in this example, we don't care. We just want the jump to never occur, because if it doesn't, the winning string is displayed, and although we didn't actually match the objective, we got the string. So how do we stop this jne statement occuring? By replacing it with a nop instruction (No Operation). This way it will continue on, and print our string. So, how do we change this. Okay, take down the offset when you are over the jne statement (when it is green/blue highlighted, green in jumps, you are over the statement), which can be seen in the status bar. For example, on my computer, the status bar reads this:


QUOTE

code:--------------------------------------------------------------------------------
Line:309 Pg 4 of 607 Code Data @: 00401180 @Offset 00000780h in File:crackme.exe
--------------------------------------------------------------------------------

So I know the offset I want to change on my computer is: 00000780. The h tells me it is a hex number. The offset may differ on your computer, so remember the one which corresponds to you, not me.

Reverse Engineering the Program

We will now use Hiew. We want to open a copy of our application (I told you to make 2 before), because W32Dasm is using the original, and we want to keep the original application. Now, you can open Hiew, and work your way through directorys to find the application, or you can do as I prefer and drag the copied exe icon into the hiew.exe icon, and it will open our application (same as issuing the command hiew file.exe in MS-DOS). You will now be presented with a hole bunch of characters on your screen. Press F4 for Mode, and select Decode (shortcut being pressing enter twice). Now, press F5 for Goto. Type in the offset, for me it is 00000780, but I can type in 780. Zeros to the left can be taken out, for example 00102101 would be 102101, but you can leave the zeros in to, if you prefer. You should be at the jne statement. Before I tell you how to change the program, I have to tell you this important note.

Every instruction in assembly is represent by a numerical instruction, called opcode. For example, JNE is 75, JE is 74, nop is 90. Statements like jne have parameters (like destination) and therefore take more bytes (our jne statement opcode is 7514). When changing a program, you must remember that when you change an instruction, you must not just leave the paremeters there, as these will turn into invalid instructions, usually causing an error. So, every 2 bytes relating to the instruction must change. For example if we wanted to change our jne statement (7514) into a nop, we must use 90 twice, so the opcode would be 9090. You do not have to remember opcodes, you can type in assembly codes, but knowing how to replace codes is important. Do not stress if you do not fully understand what I just said, as it will be demonstrated again soon.

Okay, now, lets change our jne statement. Press F3 for edit, and then press F2 for Asm (short for assembly). A box will open, with the asm instruction used. Delete this instruction, and type in "nop" without the quotation marks. Now what happens is directly related to the important note above. Our jne opcode was 7514, we typed in a nop which opcode is 90, 14 now makes an invalid instruction. So, we must replace this byte with another nop instruction, so type in nop, press enter, then escape to close the asm dialog. Press F9 for update, and then F10 for Quit. Run the application through the command line, and you will notice the end statement change from "You failed to complete the challenge. Please try again." to "You won the challenge, congragulations.". Although it still counts up. Now, we are going to reverse-engineer this application once more, to make it count down, completely fulfilling the objective, and furthering your understanding of the situation.

Reverse Engineering the Program - Part 2

What we do now is more compilicated, and requires a more deeper understanding of assembly (not too much more though). What we are going to do is make the application count down, and then display the winning string. We have already done the basic study, so we can skip that, now we want to look at the original application again (not the one we just engineered) and work out what to do. Realise that I have added comments in this readout, which are not displayed in W32Dasm (for obvious reasons), ; is the comment symbol, read these comments, it tells you what the code is doing. Here is the section we are looking at, which is the one we were looking at before, and a bit more up:


QUOTE

code:--------------------------------------------------------------------------------
* Referenced by a (U)nconditional or ©onditional Jump at Address:
|:0040117C© ; The below jle statement jumps back to this, forming a loop.
|
:00401159 6878A14100 push 0041A178
:0040115E 53 push ebx
:0040115F 685C044200 push 0042045C
:00401164 E8EF7F0000 call 00409158
:00401169 83C408 add esp, 00000008
:0040116C 50 push eax
:0040116D E8C2810000 call 00409334
:00401172 83C408 add esp, 00000008
:00401175 43 inc ebx ; Increase ebx by one
:00401176 81FBC8000000 cmp ebx, 000000C8 ; Compare ebx with 200, used by jle
:0040117C 7EDB jle 00401159 ; Jump is less or equal than 200.
:0040117E 85DB test ebx, ebx ; test if ebx is 0, same as before.
:00401180 7514 jne 00401196 ; Jumps to failed message, like before.

* Possible StringData Ref from Data Obj ->"You won the challenge, congragulations."
|
:00401182 687AA14100 push 0041A17A
:00401187 685C044200 push 0042045C
:0040118C E8A3810000 call 00409334
:00401191 83C408 add esp, 00000008
:00401194 EB12 jmp 004011A8
--------------------------------------------------------------------------------

From my comments, you should see the low level structure of a for loop. The jle jumps back through the whole process if it is under 200 (hex C8, assembly uses hex). We can see the inc increases ebx by 1 each time called.

So psedu of this is:

BEGIN PSEUDO CODE
x=100
loop:
x+1
if x is less or equal to 200, goto loop
end loop
if x does not equal 0 goto the failed message, leave here, returns after back to pseudo.
if x does equal 0 print failed message
below code initialises the cleanup and exit processes
END PSEUDO CODE

Which is very easily translated to any HLL, using the provided for loops or other type of structure.

Now we have to change this code, to make it count down to zero, and display our message. So, first we have to change the inc, because we want it to decrease the number. Then we must change the cmp instruction, as we want it to compare with zero, not 200. Then, we have to change the jle (jump if less or equal) because we want it to jump if greater/above than 0 which is the instruction ja, not jae (jump if above or equal) because than it will go down to -1, and will jump to the failed message. So, lets get the offset of the first instruction we want to change (which is the following line)


QUOTE

code:--------------------------------------------------------------------------------
:00401175 43 inc ebx
--------------------------------------------------------------------------------

The offset on my compiled program is 00000775h, as said before yours may differ.

Now, lets get to hiew. Open your 2nd copy, the copy which is unmodified. Get to the decode place (F4 -> Decode) Goto our offset (F5, type in offset) and now lets change these instructions. Please note when I say the line looks like the example, I mean under the Asm (F2) dialog. You should be at a line which reads:


QUOTE

code:--------------------------------------------------------------------------------
inc ebx
--------------------------------------------------------------------------------


Using F2 (Asm) you should change this too:

code:--------------------------------------------------------------------------------
dec ebx
--------------------------------------------------------------------------------

Now, there should be no need to add any nops here or anything, as both inc and dec use 2 digits for opcode.

Now we have to change this line (do not change until I fully explain)


QUOTE

code:--------------------------------------------------------------------------------
cmp ebx, 000000C8
--------------------------------------------------------------------------------

to

code:--------------------------------------------------------------------------------
test ebx, ebx
--------------------------------------------------------------------------------


Now, to do this we must refer to my special note I had before. cmp ebx, 000000C8 opcode is 81FBC8000000

We spilt this into twos:
cmp ebx 200
81 FB C8 00 00 00

Now, test ebx, ebx opcode is (in groups of two)
test ebx and 0
85 DB

So we must replace the 00's and C8 with nops.

So go to asm dialog where the cmp instruction is, change it to test ebx, ebx. We must than change the remain 8 bits, which is grouped into 2. Which means 4 nops, so write nop, press enter, and repeat 3 more times. (You can change opcode directly, just don't press F2 while under edit, however it is harder to remember opcode than the asm instructions.

Did you notice how after changing these instructions, the jle statement, which had disappeared, is back. This is because once you start an invalid instruction, it will affect the whole program, nearly every statement following changes, if not all. That is why it is very important to count you bytes.

Now we must change the statement which reads:


QUOTE

code:--------------------------------------------------------------------------------
jle 000000759
--------------------------------------------------------------------------------

to

code:--------------------------------------------------------------------------------
ja 000000759
--------------------------------------------------------------------------------


(please note that yo do not have to use tabs, spaces are suffecient)

After doing this, you should now press F9 to update, and F10 to exit.

Now you can run the code in your DOS, and see if you completed it correcly or not, if you did, congradulations, if not, bad luck, do try again, or if having severe problems reply to this thread of PM me.


Conclusion

That concludes this tutorial. I hope you enjoy. Good Luck. God Speed. uhh I forget if there are any more expressions for "Good Luck" Well Just Enjoy.

Good Luck
Wednesday, June 29, 2005

Credit Card Hacking in Yahoo??

I just saw this article on another site.. it says something about credit card hacking in Yahoo.. I haven't tried it though.. and perhaps I'll never will..

REAL CREDIT CARD YAHOO HACKING!

Note: Sending private information on a non-secure connection may be dangerous.

Saturday, December 25, 2004

Steps To Deface A Webpage (About Defacers)

by: b0iler

First of all, I do not deface, I never have (besides friends sites as jokes and all in good fun), and never will. So how do I know how to deface? I guess I just picked it up on the way, so I am no expert in this. If I get a thing or two wrong I apoligize. It is pretty simple when you think that defacing is just replacing a file on a computer. Now, finding the exploit in the first place, that takes skill, that takes knowledge, that is what real hackers are made of. I don't encourage that you deface any sites, as this can be used get credit cards, get passwords, get source code, billing info, email databases, etc.. (it is only right to put up some kind of warning. now go have fun ;)

This tutorial will be broken down into 3 main sections, they are as followed:
1. Finding Vuln Hosts.
2. Getting In.
3. Covering Your Tracks

It really is easy, and I will show you how easy it is.

1. Finding Vuln Hosts
This section needs to be further broken down into two catigories of script kiddies: ones who scan the net for a host that is vuln to a certain exploit and ones who search a certain site for any exploit. The ones you see on alldas are the first kind, they scan thousands of sites for a specific exploit. They do not care who they hack, anyone will do. They have no set target and not much of a purpose. In my opinion these people should either have a cause behind what they are doing, ie. "I make sure people keep up to date with security, I am a messanger" or "I am spreading a political message, I use defacments to get media attention". People who deface to get famous or to show off their skills need to grow up and relize there is a better way of going about this (not that I support the ones with other reasons ether). Anyways, the two kinds and what you need to know about them:

Scanning Script Kiddie: You need to know what signs of the hole are, is it a service? A certain OS? A CGI file? How can you tell if they are vuln? What version(s) are vuln? You need to know how to search the net to find targets which are running whatever is vuln. Use altavista.com or google.com for web based exploits. Using a script to scan ip ranges for a certain port that runs the vuln service. Or using netcraft.com to find out what kind of server they are running and what extras it runs (frontpage, php, etc..) nmap and other port scanners allow quick scans of thousands of ips for open ports. This is a favorate technique of those guys you see with mass hacks on alldas.

Targetted Site Script Kiddie: More respectable then the script kiddies who hack any old site. The main step here is gathering as much information about a site as possible. Find out what OS they run at netcraft or by using: telnet www.site.com 80 then GET / HTTP/1.1 Find out what services they run by doing a port scan. Find out the specifics on the services by telnetting to them. Find any cgi script, or other files which could allow access to the server if exploited by checking /cgi /cgi-bin and browsing around the site (remember to index browse)

Wasn't so hard to get the info was it? It may take awhile, but go through the site slowly and get all the information you can.

2. Getting In
Now that we got the info on the site we can find the exploit(s) we can use to get access. If you were a scanning script kiddie you would know the exploit ahead of time. A couple of great places to look for exploits are Security Focus and packetstorm. Once you get the exploit check and make sure that the exploit is for the same version as the service, OS, script, etc.. Exploits mainly come in two languages, the most used are C and perl. Perl scripts will end in .pl or .cgi, while C will end in .c To compile a C file (on *nix systems) do gcc -o exploit12 file.c then: ./exploit12 For perl just do: chmod 700 file.pl (not really needed) then: perl file.pl. If it is not a script it might be a very simple exploit, or just a theory of a possible exploit. Just do alittle research into how to use it. Another thing you need to check is weither the exploit is remote or local. If it is local you must have an account or physical access to the computer. If it is remote you can do it over a network (internet).

Don't go compiling exploits just yet, there is one more important thing you need to know

Covering Your Tracks
So by now you have gotten the info on the host inorder to find an exploit that will allow you to get access. So why not do it? The problem with covering your tracks isn't that it is hard, rather that it is unpredictable. just because you killed the sys logging doesn't mean that they don't have another logger or IDS running somewhere else. (even on another box). Since most script kiddies don't know the skill of the admin they are targetting they have no way of knowing if they have additional loggers or what. Instead the script kiddie makes it very hard (next to impossible) for the admin to track them down. Many use a stolden or second isp account to begin with, so even if they get tracked they won't get caught. If you don't have the luxery of this then you MUST use multiple wingates, shell accounts, or trojans to bounce off of. Linking them together will make it very hard for someone to track you down. Logs on the wingates and shells will most likely be erased after like 2-7 days. That is if logs are kept at all. It is hard enough to even get ahold of one admin in a week, let alone further tracking the script kiddie down to the next wingate or shell and then getting ahold of that admin all before the logs of any are erased. And it is rare for an admin to even notice an attack, even a smaller percent will actively pursue the attacker at all and will just secure their box and forget it ever happend. For the sake of arugment lets just say if you use wingates and shells, don't do anything to piss the admin off too much (which will get them to call authoritizes or try to track you down) and you deleting logs you will be safe. So how do you do it?

We will keep this very short and too the point, so we'll need to get a few wingates. Wingates by nature tend to change IPs or shutdown all the time, so you need an updated list or program to scan the net for them. You can get a list of wingates that is well updated at http://www.cyberarmy.com/lists/wingate/ and you can also get a program called winscan there. Now lets say we have 3 wingates:

212.96.195.33 port 23
202.134.244.215 port 1080
203.87.131.9 port 23

to use them we go to telnet and connect to them on port 23. we should get a responce like this:

CSM Proxy Server >

to connect to the next wingate we just type in it's ip:port

CSM Proxy Server >202.134.244.215:1080
If you get an error it is most likely to be that the proxy you are trying to connect to isn't up, or that you need to login to the proxy. If all goes well you will get the 3 chained together and have a shell account you are able to connect to. Once you are in your shell account you can link shells together by:

[j00@server j00]$ ssh 212.23.53.74

You can get free shells to work with until you get some hacked shells, here is a list of free shell accounts. And please remember to sign up with false information and from a wingate if possible.

SDF (freeshell.org) - http://sdf.lonestar.org
GREX (cyberspace.org) - http://www.grex.org
NYX - http://www.nxy.net
ShellYeah - http://www.shellyeah.org
HOBBITON.org - http://www.hobbiton.org
FreeShells - http://www.freeshells.net
DucTape - http://www.ductape.net
Free.Net.Pl (Polish server) - http://www.free.net.pl
XOX.pl (Polish server) - http://www.xox.pl
IProtection - http://www.iprotection.com
CORONUS - http://www.coronus.com
ODD.org - http://www.odd.org
MARMOSET - http://www.marmoset.net
flame.org - http://www.flame.org
freeshells - http://freeshells.net.pk
LinuxShell - http://www.linuxshell.org
takiweb - http://www.takiweb.com
FreePort - http://freeport.xenos.net
BSDSHELL - http://free.bsdshell.net
ROOTshell.be - http://www.rootshell.be
shellasylum.com - http://www.shellasylum.com
Daforest - http://www.daforest.org
FreedomShell.com - http://www.freedomshell.com
LuxAdmin - http://www.luxadmin.org
shellweb - http://shellweb.net
blekko - http://blekko.net

once you get on your last shell you can compile the exploit, and you should be safe from being tracked. But lets be even more sure and delete the evidence that we were there.

Alright, there are a few things on the server side that all script kiddies need to be aware of. Mostly these are logs that you must delete or edit. The real script kiddies might even use a rootkit to automaticly delete the logs. Although lets assume you aren't that lame. There are two main logging daemons which I will cover, klogd which is the kernel logs, and syslogd which is the system logs. First step is to kill the daemons so they don't log anymore of your actions.

[root@hacked root]# ps -def | grep syslogd
[root@hacked root]# kill -9 pid_of_syslogd

in the first line we are finding the pid of the syslogd, in the second we are killing the daemon. You can also use /etc/syslog.pid to find the pid of syslogd.

[root@hacked root]# ps -def | grep klogd
[root@hacked root]# kill -9 pid_of_klogd

Same thing happening here with klogd as we did with syslogd.

now that killed the default loggers the script kiddie needs to delete themself from the logs. To find where syslogd puts it's logs check the /etc/syslog.conf file. Of course if you don't care if the admin knows you were there you can delete the logs completely. Lets say you are the lamest of the script kiddies, a defacer, the admin would know that the box has been comprimised since the website was defaced. So there is no point in appending the logs, they would just delete them. The reason we are appending them is so that the admin will not even know a break in has accurd. I'll go over the main reasons people break into a box:


To deface the website. - this is really lame, since it has no point and just damages the system.


To sniff for other network passwords. - there are programs which allow you to sniff other passwords sent from and to the box. If this box is on an ethernet network then you can even sniff packets (which contain passwords) that are destine to any box in that segment.


To mount a DDoS attack. - another lame reason, the admin has a high chance of noticing that you comprimised him once you start sending hundreds of MBs through his connection.


To mount another attack on a box. - this and sniffing is the most commonly used, not lame, reason for exploiting something. Since you now how a rootshell you can mount your attack from this box instead of those crappy freeshells. And you now have control over the logging of the shell.


To get sensitive info. - some corperate boxes have alot of valueable info on them. Credit card databases, source code for software, user/password lists, and other top secret info that a hacker may want to have.


To learn and have fun. - many people do it for the thrill of hacking, and the knowledge you gain. I don't see this as horrible a crime as defacing. as long as you don't destroy anything I don't think this is very bad. Infact some people will even help the admin patch the hole. Still illegal though, and best not to break into anyone's box.


I'll go over the basic log files: utmp, wtmp, lastlog, and .bash_history
These files are usually in /var/log/ but I have heard of them being in /etc/ /usr/bin/ and other places. Since it is different on alot of boxes it is best to just do a find / -iname 'utmp'|find / -iname 'wtmp'|find / -iname 'lastlog'. and also search threw the /usr/ /var/ and /etc/ directories for other logs. Now for the explanation of these 3.

utmp is the log file for who is on the system, I think you can see why this log should be appended. Because you do not want to let anyone know you are in the system. wtmp logs the logins and logouts as well as other info you want to keep away from the admin. Should be appended to show that you never logged in or out. and lastlog is a file which keeps records of all logins. Your shell's history is another file that keeps a log of all the commands you issued, you should look for it in your $ HOME directory and edit it, .sh_history, .history, and .bash_history are the common names. you should only append these log files, not delete them. if you delete them it will be like holding a big sign infront of the admin saying "You've been hacked". Newbie script kiddies often deface and then rm -rf / to be safe. I would avoid this unless you are really freaking out. In this case I would suggest that you never try to exploit a box again. Another way to find log files is to run a script to check for open files (and then manually look at them to determine if they are logs) or do a find for files which have been editted, this command would be: find / -ctime 0 -print

A few popular scripts which can hide your presence from logs include: zap, clear and cloak. Zap will replace your presence in the logs with 0's, clear will clear the logs of your presence, and cloak will replace your presence with different information. acct-cleaner is the only heavily used script in deleting account logging from my experience. Most rootkits have a log cleaning script, and once you installed it logs are not kept of you anyways. If you are on NT the logs are at C:\winNT\system32\LogFiles\, just delete them, nt admins most likely don't check them or don't know what it means if they are deleted.

One final thing about covering your tracks, I won't go to into detail about this because it would require a tutorial all to itself. I am talking about rootkits. What are rootkits? They are a very widely used tool used to cover your tracks once you get into a box. They will make staying hidden painfree and very easy. What they do is replace the binaries like login, ps, and who to not show your presence, ever. They will allow you to login without a password, without being logged by wtmp or lastlog and without even being in the /etc/passwd file. They also make commands like ps not show your processes, so no one knows what programs you are running. They send out fake reports on netstat, ls, and w so that everything looks the way it normally would, except anything you do is missing. But there are some flaws in rootkits, for one some commands produce strange effects because the binary was not made correctly. They also leave fingerprints (ways to tell that the file is from a rootkit). Only smart/good admins check for rootkits, so this isn't the biggest threat, but it should be concidered. Rootkits that come with a LKM (loadable kernel module) are usually the best as they can pretty much make you totally invisible to all others and most admins wouldn't be able to tell they were comprimised.

In writting this tutorial I have mixed feelings. I do not want more script kiddies out their scanning hundreds of sites for the next exploit. And I don't want my name on any shouts. I rather would like to have people say "mmm, that defacing crap is pretty lame" especially when people with no lives scan for exploits everyday just to get their name on a site for a few minutes. I feel alot of people are learning everything but what they need to know inorder to break into boxes. Maybe this tutorial cut to the chase alittle and helps people with some knowledge see how simple it is and hopefully make them see that getting into a system is not all it's hyped up to be. It is not by any means a full guide, I did not cover alot of things. I hope admins found this tutorial helpful aswell, learning that no matter what site you run you should always keep on top of the latest exploits and patch them. Protect yourself with IDS and try finding holes on your own system (both with vuln scanners and by hand). Also setting up an external box to log is not a bad idea. Admins should have also seen alittle bit into the mind of a script kiddie and learned a few things he does.. this should help you catch one if they break into your systems.

On one final note, defacing is lame. I know many people who have defaced in the past and regret it now. You will be labeled a script kiddie and a lamer for a long, long time.

Monday, October 11, 2004

Excel Inputs

Here’s how to add spinners, check boxes, and other useful controls to your worksheets.

Even if you’ve used Excel for years, you may not know about its form controls, which let you enter worksheet values using elements like sliders, spinners, list boxes, and check boxes. We’ll show you how these controls work, give you handy tips for customizing them, and look at some applications.

The Spinner Control

The spinner lets you alter the value in a cell by clicking an up or down arrow on the control. The techniques for customizing spinners also apply to scroll-bar controls, so you’re learning two controls in one, effectively.

Create a simple savings worksheet by entering the data shown in the table below. Note that row 6 is blank.

Cell Value

A1 Savings calculator

A2 Interest rate p.a.

B2 6%

A3 Number of years

B3 4

A4 Monthly deposit

B4 -200

A5 Initial balance

B5 -100

A7 Amount saved

B7 =FV(B2/12, B3*12, B4, B5, 0)

This worksheet calculates the amount saved at the end of four years if you start with $100 and save $200 a month at an interest rate of 6 percent compounded monthly. Monies paid out are expressed as negative values, so your starting deposit and the monthly payments are negative. This simple example offers plenty of options for using spinners.

Begin by creating a spinner to adjust the number of years shown in cell B3. Choose View Toolbars Forms to display the Forms toolbar and locate the Spinner control. Click the control and place it by using your mouse to draw a rectangle in cell C3. Right-click the control, choose Format Control..., and select the Control tab. Set the Current value to 4, the Maximum value to 20, and the Cell link to B3, then click OK.

Deselect the spinner by clicking away from it in the worksheet; test the spinner by clicking its up and down arrows. As you click, the value in the linked cell (B3) should increase or decrease within the specified range.

Overcoming Limitations

Spinners are limited to returning integers between 0 and 30,000, but you can get a range of real numbers (including negative numbers) by performing some simple arithmetic on the value returned by the spinner. To show how this is done, we’ll add a second spinner to adjust the interest rate in quarter-point increments.

Place the spinner in cell C2 and right-click on it. Choose Format Control..., select the Control tab, and set the Current value to 24, the Maximum value to 40, and the Cell link to E2, then click OK. Now format cell B2 to show percentage with two decimal places, and alter the cell’s contents to read: =E2/400. When you click the new spinner, you’ll see the value in cell B2 change in increments of .25 percent, from 0 to 10 percent. The new formula in B2 takes the value the spinner returns in cell E2 (a number from 0 to 40) and divides it by 400 to produce the displayed value.

You can also create a spinner to give you the negative value that represents your monthly deposit. Add a third spinner, this time in cell C4. Set the Current value to 200, the Maximum value to 30000, the Incremental change to 10, and the Cell link to E4, then click OK. In cell B4, type -E4 and test the spinner. The E4 value will change in increments of 10 within the range 0 to 30000, giving B4 values ranging from 0 to -30000. You can create a range of values by using a different formula or by modifying parameters like the maximum value.

Check Boxes

Check boxes are controls that return either true or false, depending on whether they are selected or cleared. They are useful for managing options that have only two possible settings, such as on/off, true/false, or 1/0. In our example, the last argument in the formula in cell B7 is currently set to 0, which indicates that the payment (the amount saved each month) is due at the end of every month. Changing this value to 1 alters the calculation to show the result when payments are made at the beginning of each month. This is a good use for a check box.

Click the Check Box control and add a check box into cell B6. Right-click this control and choose Format Control... Control tab. From the Value options choose Unchecked. Set the Cell link to E6 and click OK. Alter the formula in cell B7 to read: =FV(B2/12, B3*12, B4, B5, E6)

Change the check box’s text by right-clicking it and choosing Edit Text. In place of the current text, type: Payments made at beginning of period, then adjust the size of the control so the text can be clearly seen. Test the box by clicking in it; the value in cell B7 should change according to whether the check box is selected or not.

Combo Boxes

The final control we’ll look at is the combo box, which lets you choose an entry from a list. Combo boxes are handy when you have a fixed number of choices and can be used to return more than one piece of data from a table of data.

To understand more about the combo box control (and its close relative, the list box), type these values into a blank worksheet.

Cell Value

A2 J. Brown

B2 CA

C2 10%

A3 P. Smith

B3 NY

C3 12%

A4 J. Peters

B4 TX

C4 9%

A7 Sales

B7 Salesperson

C7 State

D7 Commission

A8 200000

C8 =INDEX(A2:C4,E2,2)

D8 =INDEX(A2:C4,E2,3)*A8

Ignore the errors that appear in cells C8 and D8. Click the Combo Box control and draw a combo box in cell B8. Right-click the control, choose Format Control... and the Control tab, set the Input Range to A2:A4, set the Cell link to cell E2, and click OK. You can now choose a salesperson from the combo box. When you do so, the person’s state will appear in cell C8 and the commission amount will appear in cell D8.

The combo box control returns the position of the selected item in the Input range list. The first item—J. Brown, in this example—is in position 1. In our sample worksheet, each INDEX function queries the array A2:C4 and returns the value in the row and column specified by the formula. The row number is the value returned in cell E2 by the combo box. The column number is supplied in the INDEX function itself.

Note that the data in column E is necessary but does not have to be visible. You can hide it by right-clicking the column and choosing Hide.

This covers the basics of using form controls on your worksheets. You’ll find other controls on the Forms toolbar, such as the Option Button, the List Box, and the Scroll Bar. Each of these works in a similar way to one of the controls we’ve looked at. Option buttons work like check boxes, but only one at a time can be selected. Scroll bars work like spinners, but also include sliders. List boxes work like combo boxes, but the full list can be visible. Some controls on the toolbar are grayed; these cannot be used on worksheets. See the sidebar for directions to Microsoft Knowledge Base articles that discuss these controls.

Saturday, October 02, 2004

The System Boot Process Explained

The typical computer system boots over and over again with no problems, starting the computer's operating system (OS) and identifying its hardware and software components that all work together to provide the user with the complete computing experience. But what happens between the time that the user powers up the computer and when the GUI icons appear on the desktop?

In order for a computer to successfully boot, its BIOS, operating system and hardware components must all be working properly; failure of any one of these three elements will likely result in a failed boot sequence.

When the computer's power is first turned on, the CPU initializes itself, which is triggered by a series of clock ticks generated by the system clock. Part of the CPU's initialization is to look to the system's ROM BIOS for its first instruction in the startup program. The ROM BIOS stores the first instruction, which is the instruction to run the power-on self test (POST), in a predetermined memory address.

POST begins by checking the BIOS chip and then tests CMOS RAM. If the POST does not detect a battery failure, it then continues to initialize the CPU, checking the inventoried hardware devices (such as the video card), secondary storage devices, such as hard drives and floppy drives, ports and other hardware devices, such as the keyboard and mouse, to ensure they are functioning properly.

Once the POST has determined that all components are functioning properly and the CPU has successfully initialized, the BIOS looks for an OS to load. The BIOS typically looks to the CMOS chip to tell it where to find the OS, and in most PCs, the OS loads from the C drive on the hard drive even though the BIOS has the capability to load the OS from a floppy disk, CD or ZIP drive. The order of drives that the CMOS looks to in order to locate the OS is called the boot sequence, which can be changed by altering the CMOS setup. Looking to the appropriate boot drive, the BIOS will first encounter the boot record, which tells it where to find the beginning of the OS and the subsequent program file that will initialize the OS.

Once the OS initializes, the BIOS copies its files into memory and the OS basically takes over control of the boot process. Now in control, the OS performs another inventory of the system's memory and memory availability (which the BIOS already checked) and loads the device drivers that it needs to control the peripheral devices, such as a printer, scanner, optical drive, mouse and keyboard. This is the final stage in the boot process, after which the user can access the system’s applications to perform tasks.

Source: http://www.webopedia.com

Wednesday, September 15, 2004

What is Spyware?

Spyware is Internet jargon for Advertising Supported software (Adware). It is a way for shareware authors to make money from a product, other than by selling it to the users. There are several large media companies that offer them to place banner ads in their products in exchange for a portion of the revenue from banner sales. This way, you don't have to pay for the software and the developers are still getting paid. If you find the banners annoying, there is usually an option to remove them, by paying the regular licensing fee.

Why is it called "Spyware" ?
While this may be a great concept, the downside is that the advertising companies also install additional tracking software on your system, which is continuously "calling home", using your Internet connection and reports statistical data to the "mothership". While according to the privacy policies of the companies, there will be no sensitive or identifying data collected from your system and you shall remain anonymous, it still remains the fact, that you have a "live" server sitting on your PC that is sending information about you and your surfing habits to a remote location.....

Are all Adware products "Spyware"?
No, but the majority are. There are also products that do display advertising but do not install any tracking mechanism on your system.

Is Spyware illegal?
Even though the name may indicate so, Spyware is not an illegal type of software in any way. However there are certain issues that a privacy oriented user may object to and therefore prefer not to use the product. This usually involves the tracking and sending of data and statistics via a server installed on the user's PC and the use of your Internet connection in the background.

What's the hype about?
While legitimate adware companies will disclose the nature of data that is collected and transmitted in their privacy statement (linked from our database), there is almost no way for the user to actually control what data is being sent. The fact is that the technology is in theory capable of sending much more than just banner statistics - and this is why many people feel uncomfortable with the idea.

On the other hand...
Millions of people are using advertising supported "spyware" products and could not care less about the privacy hype..., in fact some "Spyware" programs are among the most popular downloads on the Internet.


Real spyware...
There are also many PC surveillance tools that allow a user to monitor all kinds of activity on a computer, ranging from keystroke capture, snapshots, email logging, chat logging and just about everything else. These tools are often designed for parents, businesses and similar environments, but can be easily abused if they are installed on your computer without your knowledge.

These tools are perfectly legal in most places, but, just like an ordinary tape recorder, if they are abused, they can seriously violate your privacy.


Facts about "Computer E-mail Viruses"

by: Erick Gerlitz

Does this sound familiar: "Don't read or open any e-mail titled Good Times! It will destroy your computer!" Many of you have received e-mails warning you of reading a specific e-mail sent to you going by a certain name (e.g.- "Good Times," etc.). These warnings tell you your computer will face certain doom if you open these e-mails and read them. THESE WARNINGS ARE A HOAX.

The TRUTH of the matter is, *YOU CAN NOT GET A VIRUS OR ANY SYSTEM DAMAGING SOFTWARE BY READING AN E-MAIL*. E-mails (that is, the ACTUAL message) can not contain viruses. This is why:


>> A virus can not exist in an e-mail text message. They also can NOT exist in USENET (newsgroup) postings or simply "float around" the internet. Viruses must be attached to and infect an executable program (.exe, .com). Viruses and other system-destroying bugs can ONLY exist in EXECUTABLE FILES, and since e-mail is not a system file in that sense, viruses can not exist there. While reading e-mail, you are not executing any malicious code to activate! Thus, no virus can exist. HOWEVER, if you (or your computer) download a FILE attached to an e-mail or USENET posting (i.e.-binary) and RUN it, there IS a chance that file could contain a virus, since a runable file could contain a virus. It is also very important that you DO NOT, under any circumstances, allow your e-mail program to automatically execute an attached file. You risk infection by doing so!

>> Viruses are generally (almost always) OS (operating system)-specific. Meaning, viruses created for a DOS application can do no damage on a Macintosh, and vice-versa. If you take a careful look at these e-mail hoaxs, you'll notice that very few are specific about which system it "infects." There has been one exception to the OS-specific rule, which is called the Microsoft Word Macro Virus, which infects documents instead of the program. This virus can affect both Macintosh and PC computers because of the way the application was written (it contains the same source code on several OS's). In the future, we might see viruses cross OS-boundries because Java, ActiveX programming languages break the typical "rules" of how a virus is OS-specific.

>> If you carefully read these hoax letters, you can pick out strange, non-sensical technical jargon, used to confuse and scare those who aren't computer experts. This jargon usually talks about systems of a computer that don't exist or things that aren't possible.

Monday, August 16, 2004

BEGINNERS "STEP BY STEP" SECURITY GUIDE, v0.1.32

By Overlord, © June, 1998. The latest version of this guide is always avaliable from http://www.cyberarmy.com/. You are free to distribute this page on your site, all I ask is that you leave this notice here and place a link to www.cyberarmy.com on your site.......

http://www.hnc3k.com/stepbystephacktute.htm